How to create Kubernetes cluster using Terraform on WEkEO Elasticity
In this article we demonstrate using Terraform to deploy an OpenStack Magnum Kubernetes cluster on WEkEO Elasticity cloud.
Prerequisites
No. 1 Hosting account
You need an active WEkEO Elasticity account https://wekeoelasticity.cloudferro.com/.
No. 2 Active CLI session with OpenStackClient for Linux
You need an OpenStack CLI installed and the respective Python virtual environment sourced. For guidelines see:
How to install OpenStackClient for Linux on WEkEO Elasticity
It will show you how to install Python, create and activate a virtual environment, and then connect to the cloud by downloading and activating the proper RC file from the WEkEO Elasticity cloud.
No. 3 Connect to the cloud via an RC file
Another article, /accountmanagement/How-to-activate-OpenStack-CLI-access-to-WEkEO-Elasticity-cloud-using-one-or-two-factor-authentication, deals with connecting to the cloud and is covering either of the one- or two-factor authentication procedures that are enabled on your account. It also covers all the main platforms: Linux, MacOS and Windows.
You will use both the Python virtual environment and the downloaded RC file after Terraform has been installed.
No. 4 Familiarity with creating Kubernetes clusters
Familiarity with creating Kubernetes clusters in a standard way e.g. using Horizon or OpenStack CLI:
How to Create a Kubernetes Cluster Using WEkEO Elasticity OpenStack Magnum
How To Use Command Line Interface for Kubernetes Clusters On WEkEO Elasticity OpenStack Magnum
No. 5 Terraform operational
Have Terraform installed locally or on a cloud VM - installation guidelines along with further information can be found in this article:
Generating and authorizing Terraform using Keycloak user on WEkEO Elasticity
After you finish working through that article, you will have access to the cloud via an active openstack command. Also, special environmental (env) variables (OS_USERNAME, OS_PASSWORD, OS_AUTH_URL and others) will be set up so that various programs can use them – Terraform being the prime target here.
Define provider for Terraform
Terraform uses the notion of provider, which represents your concrete cloud environment and covers authentication. WEkEO Elasticity clouds are built complying with OpenStack technology and OpenStack is one of the standard types of providers for Terraform.
We need to:
instruct Terraform to use OpenStack as a provider type
provide credentials which will to point to our own project and user in the cloud.
Assuming you have worked through Prerequisite No. 2 (download and source the RC file), several OpenStack-related environment variables will be populated in your local system. The ones pointing to your OpenStack environment start with OS, e.g. OS_USERNAME, OS_PASSWORD, OS_AUTH_URL. When we define OpenStack as TerraForm provider type, Terraform will know to automatically use these env variables to authenticate.
Let’s define the Terraform provider now by creating file provider.tf with the following contents:
provider.tf
# Define providers
terraform {
required_version = ">= 0.14.0"
  required_providers {
    openstack = {
      source  = "terraform-provider-openstack/openstack"
      version = "~> 1.35.0"
    }
  }
}

# Configure the OpenStack Provider
provider "openstack" {
  auth_url =  "https://keystone.cloudferro.com:5000/v3"
  # the rest of configuration parameters are taken from environment variables once RC file is correctly sourced
}
The auth_url is the only configuration option that shall be provided in the configuration file, despite it also being available within the environment variables.
Having this provider spec allows us to create a cluster in the following steps, but can also be reused to create other resources in your OpenStack environment e.g. virtual machines, volumes and many others.
Define cluster resource in Terraform
The second step is to define the exact specification of a resource that we want to create with Terraform. In our case we want to create a OpenStack Magnum cluster. In Terraform terminology, it will be an instance of openstack_containerinfra_cluster_v1 resource type. To proceed, create file cluster.tf which contains the specification of our cluster:
cluster.tf
# Create resource
resource "openstack_containerinfra_cluster_v1" "k8s-cluster" {
  name                      = "k8s-cluster"
  cluster_template_id       = "524535ed-9a0f-4b70-966f-6830cdc52604"
  node_count                = 3
  master_count              = 3
  flavor                    = "eo1.large"
  master_flavor             = "hmad.medium"
  keypair                   = "mykeypair"
  labels = {
    eodata_access_enabled   = true
    etcd_volume_size        = 0
  }
  merge_labels              = true
}
The above setup reflects a cluster with some frequently used customizations:
- cluster_template_id
corresponds to the ID of one of default cluster templates in WAW3-2 cloud, which is k8s-localstorage-1.23.16-v1.0.0. The default templates and their IDs can be looked up in Horizon UI interface in the submenu Cluster Infra -→ Container Templates.
- node_count, node_flavor, master_node_count, master_node_flavor
correspond intuitively to count and flavor of master and worker nodes in the cluster.
- keypair
reflects the name of keypair used in our openstack project in the chosen cloud
- labels and merge_labels
We use two labels:
- eodata_access_enabled=true
ensures that EODATA network with fast access to satellite images is connected to our cluster nodes,
- etcd_volume_size=0
which ensures that master nodes are properly provisioned with NVME local storage.
With this configuration, it is mandatory to also use configuration merge_labels=true to properly apply these labels and avoid overwriting them by template defaults.
In our example we operate on WAW3-2 cloud, where flavor hmad.medium is available. If using another cloud, adjust the parameters accordingly.
The above configuration reflects a cluster where loadbalancer is placed in front of the master nodes, and where this loadbalancer’s flavor is HA-large. Customizing this default, similarly as with other more advanced defaults, would require creating a custom Magnum template, which is beyond the scope of this article.
Apply the configurations and create the cluster
Once both Terraform configurations described in previous steps are defined, we can apply them to create our cluster.
The first step is to have both files provider.tf and cluster.tf available in a dedicated folder. Then cd to this folder and type:
terraform init
This command will initialize our cluster deployment. It will capture any formal errors with authentication to OpenStack, which might need correcting before moving to the next stage.

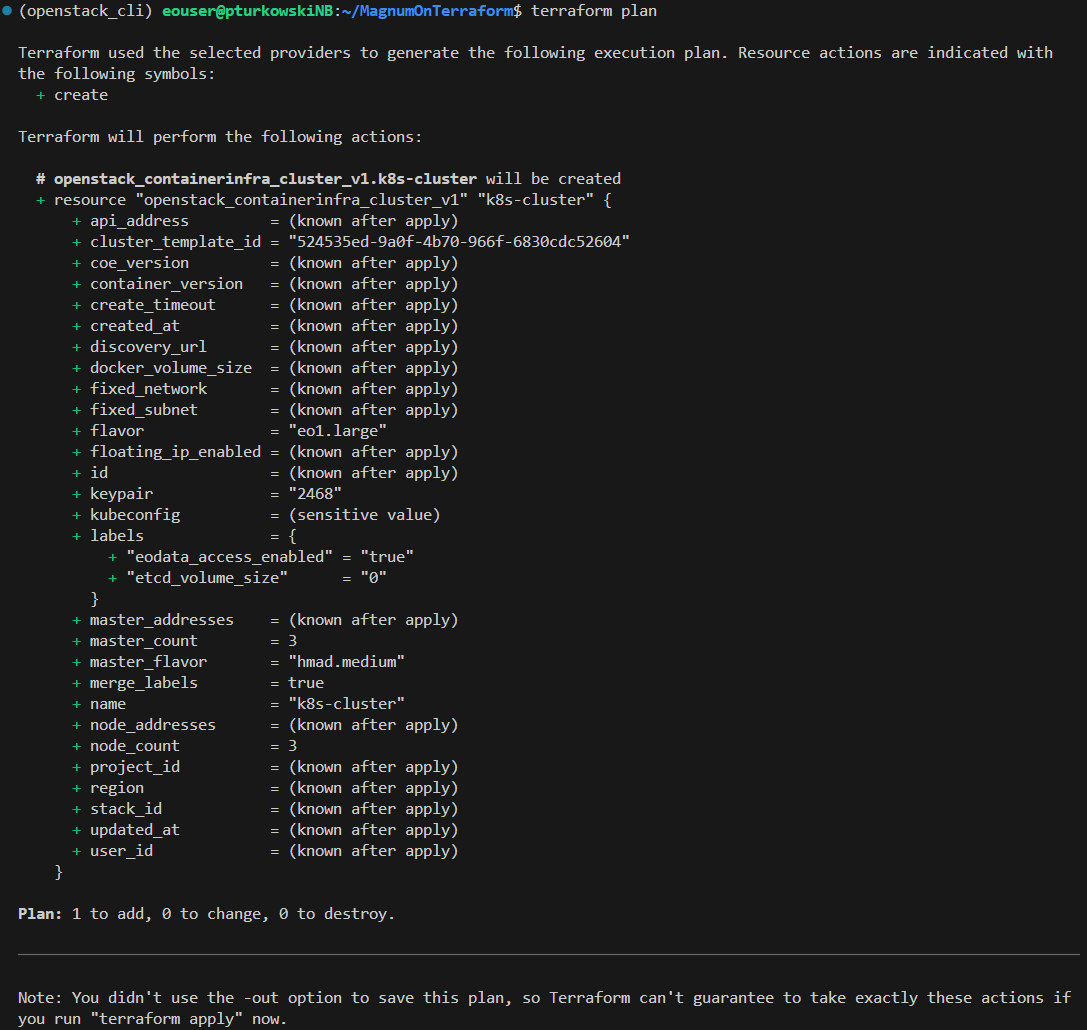
As the next step, Terraform will plan the actions it needs to perform to create the resource. Proceed with typing:
terraform plan
The result is shown below and gives a chance to correct any logical errors to our expected setup:
The last step is to apply the planned changes. Perform this step with the command:
terraform apply
The output of this last command will initially repeat the plan, then ask to enter word yes to set the Terraform into action.
Upon confirming with yes, the action is deployed and the console will update every 10 seconds to give a “Still creating …” check until our cluster is created.
The final lines of the output after successfully provisioning the cluster, should read similar to the below:

What To Do Next
Terraform can be used also to deploy additional applications to our cluster e.g. using Helm provider for Terraform. Check Terraform documentation for more details.