GitOps with Argo CD on WEkEO Elasticity Kubernetes
Argo CD is a continuous deployment tool for Kubernetes, designed with GitOps and Infrastructure as Code (IaC) principles in mind. It automatically ensures that the state of applications deployed on a Kubernetes cluster is always in sync with a dedicated Git repository where we define such desired state.
In this article we will demonstrate installing Argo CD on a Kubernetes cluster and deploying an application using this tool.
What We Are Going To Cover
Install Argo CD
Access Argo CD from your browser
Create Git repository and push your app deployment configurations
Create and deploy Argo CD application resource
View the deployed resources
Prerequisites
No. 1 Account
You need a WEkEO Elasticity hosting account with access to the Horizon interface: https://horizon.cloudferro.com.
No. 2 Kubernetes cluster
How to Create a Kubernetes Cluster Using WEkEO Elasticity OpenStack Magnum
No. 3 Access to cluster with kubectl
How To Access Kubernetes Cluster Post Deployment Using Kubectl On WEkEO Elasticity OpenStack Magnum
No. 4 Familiarity with Helm
Here is how to install and start using Helm charts:
Deploying Helm Charts on Magnum Kubernetes Clusters on WEkEO Elasticity WAW3-1
No. 5 Access to your own Git repository
You can host the repository for this article on GitLab instance created in article Install GitLab on WEkEO Elasticity Kubernetes. You may also use it with GitHub, GitLab and other source control platforms based on git.
No. 6 git CLI operational
git command installed locally. You may use it with GitHub, GitLab and other source control platforms based on git.
No. 7 Access to exemplary Flask application
You should have access to the example Flask application, to be downloaded from GitHub in the article. It will serve as an example of a minimal application and by changing it, we will demonstrate that Argo CD is capturing those changes in a continual manner.
Step 1 Install Argo CD
Let’s install Argo CD first, under the following assumptions:
this article has been tested on Kubernetes version 1.25
use GUI only (no CLI used in this guide)
deploy Argo CD without TLS certificates.
Here is an in-depth installation guide.
For production scenarios, it is recommended to apply TLS.
Let’s first create a dedicated namespace within our existing Kubernetes cluster. The namespace should be explicitly named argocd:
kubectl create namespace argocd
Then install Argo CD:
kubectl apply -n argocd -f https://raw.githubusercontent.com/argoproj/argo-cd/stable/manifests/install.yaml
Step 2 Access Argo CD from your browser
The Argo CD web application by default is not accessible from the browser. To enable this, change the applicable service from ClusterIP to LoadBalancer type with the command:
kubectl patch svc argocd-server -n argocd -p '{"spec": {"type": "LoadBalancer"}}'
After 1-2 minutes, retrieve the IP address of the service:
kubectl get service argocd-server -n argocd
In our case, this provides the below result and indicates we have Argo CD running on IP address 185.254.233.247:

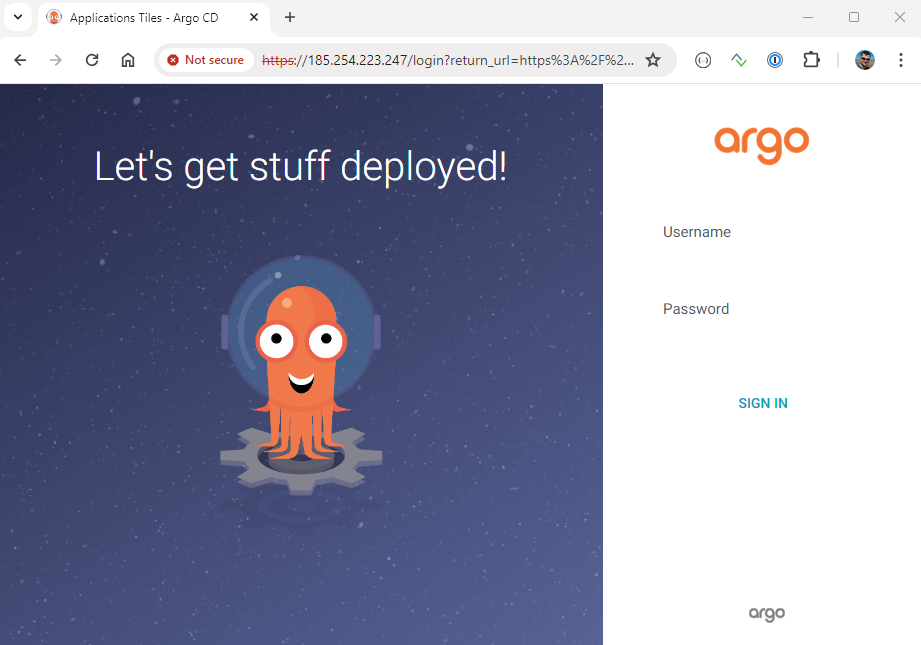
Type the IP address you extracted to your browser (it will be a different IP address in your case, so be sure to replace 185.254.233.247 cited here with your own address). You will expectedly get a warning of invalid certificate. To suppress the warning, click “Advanced” and then “Proceed to Unsafe” and be transferred to the login screen of Argo CD:
The login is admin. To get the password, extract it from the deployed Kubernetes secret with the following command:
kubectl get secret argocd-initial-admin-secret -n argocd -ojsonpath='{.data.password}' | base64 --decode ; echo
After typing in your credentials to the login form, you get transferred to the following screen:
Step 3 Create a Git repository
You need to create a git repository first. The state of the application on your Kubernetes cluster will be synced to the state of this repo. It is recommended that it is a separate repository from your application code, to avoid triggering the CI pipelines whenever we change the configuration.
You will copy to this newly created repository files already available in (a different) GitHub repo mentioned in the Prerequisite No. 5 Git CLI operational.
Create the repository first, we call ours argocd-sample. While filling in the form, check off the initialization with README and choose Public visibility:
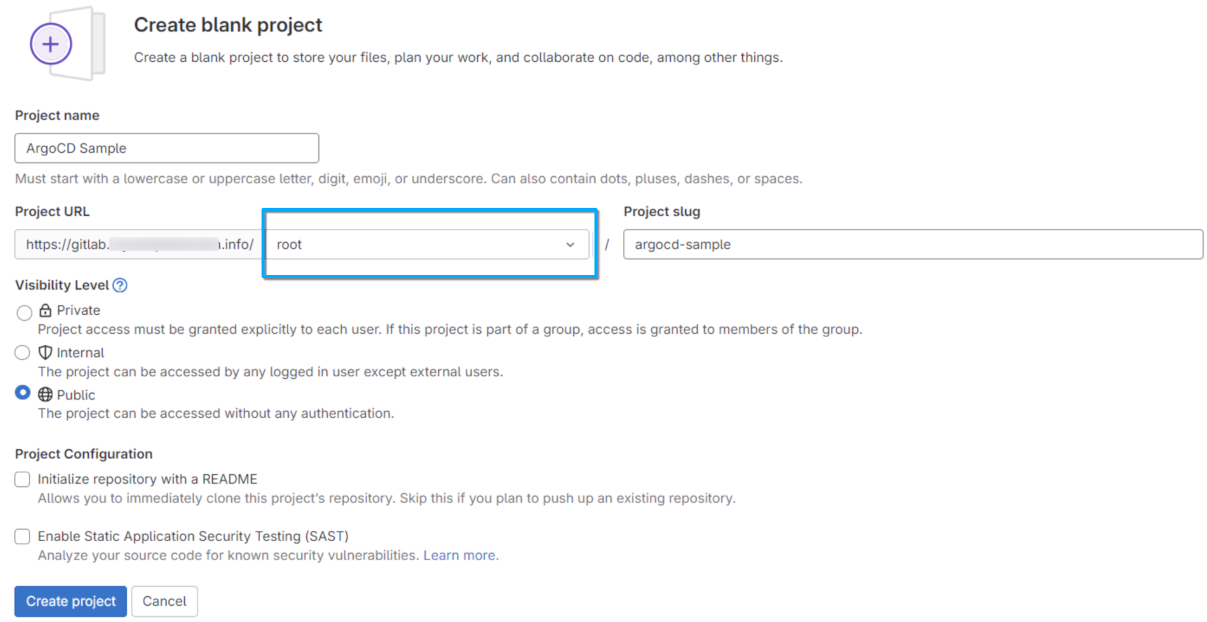
In that view, project URL will be pre-filled and corresponding to the URL of your GitLab instance. In the place denoted with a blue rectangle, you should enter your user name; usually, it will be root but can be anything else. If there already are some users defined in GitLab, their names will appear in a drop-down menu.
Step 4 Download Flask application
The next goal is to download two yaml files to a folder called ArgoCD-sample and its subfolder deployment.
After submitting the “Create project” form, you will receive a list of commands to work with your repo. Review them and switch to the CLI from Prerequisite No. 6. Clone the entire CloudFerro K8s samples repo, then extract the sub-folder called Flask-K8s-deployment. For clarity, we rename its contents to a new folder, ArgoCD-sample. Use
mkdir ~/ArgoCD-sample
if this is the first time you are working through this article. Then apply the following set of commands:
git clone https://github.com/CloudFerro/K8s-samples
mv ~/K8s-samples/Flask-K8s-deployment ~/ArgoCD-sample/deployment
rm K8s-samples/ -rf
Files deployment.yaml and service.yaml deploy a sample Flask application on Kubernetes and expose it as a service. These are typical minimal examples for deployment and service and can be obtained from the CloudFerro Kubernetes samples repository.
Step 5 Push your app deployment configurations
Then you need to upload files deployment.yaml and service.yaml files to the remote repository. Since you are using git, you perform the upload by syncing your local repo with the remote. First initiate the repo locally, then push the files to your remote with the following commands (replace to your own git repository instance):
cd ArgoCD-sample
git init
git remote add origin git@gitlab.mysampledomain.info:root/ArgoCD-sample.git
git add .
git commit -m "First commit"
git push origin master
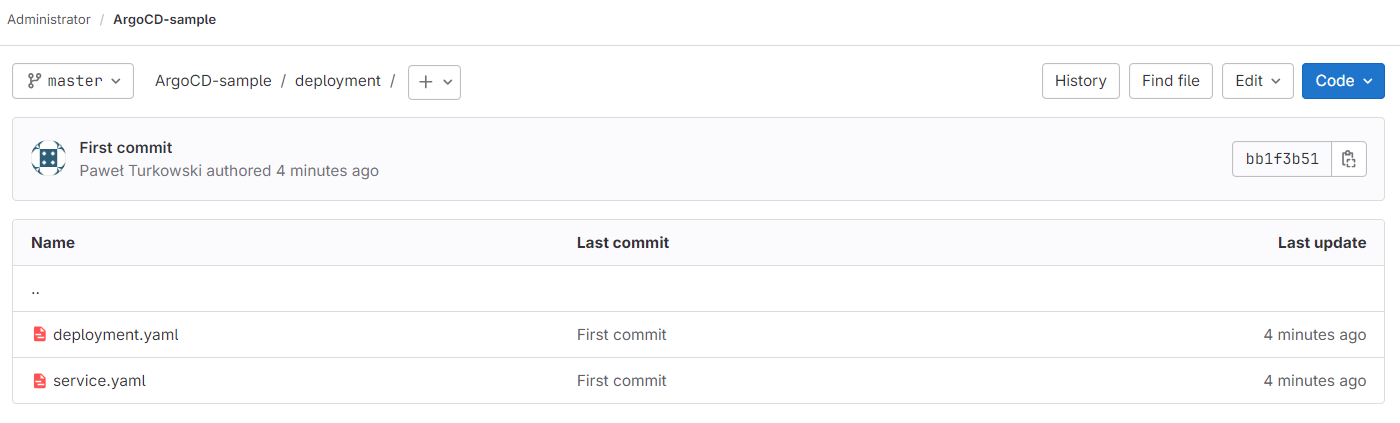
As a result, at this point, we have the two files available in remote repository, in deployment folder:
Step 6 Create Argo CD application resource
Argo CD configuration for a specific application is defined using an application custom resource. Such resource connects a Kubernetes cluster with a repository where deployment configurations are stored.
Directly in the ArgoCD-sample folder, create file application.yaml, which will represent the application; be sure to replace gitlab.mysampledomain.info with your own domain.
application.yaml
apiVersion: argoproj.io/v1alpha1
kind: Application
metadata:
  name: myapp-application
  namespace: argocd
spec:
  project: default
  syncPolicy:
    syncOptions:
    - CreateNamespace=true
    automated:
      selfHeal: true
      prune: true
  source:
    repoURL: https://gitlab.mysampledomain.info/root/argocd-sample.git
    targetRevision: HEAD
    path: deployment
  destination:
    server: https://kubernetes.default.svc
    namespace: myapp
Some explanations of this file:
- spec.project.default
Specifies that our application is associated with the default project (represented as appproject CRD in Kubernetes). Additional projects can be created and used for managing multiple applications.
- spec.syncPolicy.syncOptions.CreateNamespace=true
Ensures that a namespace (specified in spec.destination.namespace) will be automatically created on our cluster if it does not exist already
- spec.syncPolicy.automated.selfHeal: true
Ensures that any manual changes in the cluster (e.g. applied using kubectl) will trigger a synchronization with the Git repo, overwrite these manual changes and therefore ensure consistency between the cluster and the repo state.
- spec.syncPolicy.automated.prune: true
Ensures that deletion of a resource definition in the repo will also delete this resource from the Kubernetes cluster
- spec.source.repoURL
This is the URL of our git repository where deployment artifacts reside.
- spec.source.targetRevision.HEAD
Ensures that Kubernetes cluster will be synced with the most recent update on the git repository.
- spec.source.source.path
The name of the folder in the Git repository, where the yaml manifests are stored.
- spec.destination.server
The address of the Kubernetes cluster where we deploy our app. Since this is the same cluster where Argo CD is running, it can be accessed using the cluster’s internal DNS addressing.
- spec.destination.namespace
The namespace in the cluster where the application will be deployed.
Step 7 Deploy Argo CD application
After we created the application.yaml file, the next step is to commit it and push to the remote repo. We can do this with the following commands:
git add -A
git commit -m "Added application.yaml file"
git push origin master
The final step is to apply the application.yaml configuration to the cluster with the command below:
kubectl apply -f application.yaml
Step 8 View the deployed resources
After performing the steps above, switch views to the Argo CD UI. We can see that our application appears on the list of applications and that the state to be applied on the cluster was properly captured from the Git repo. It will take a few minutes to complete the deployment of resources on the cluster:
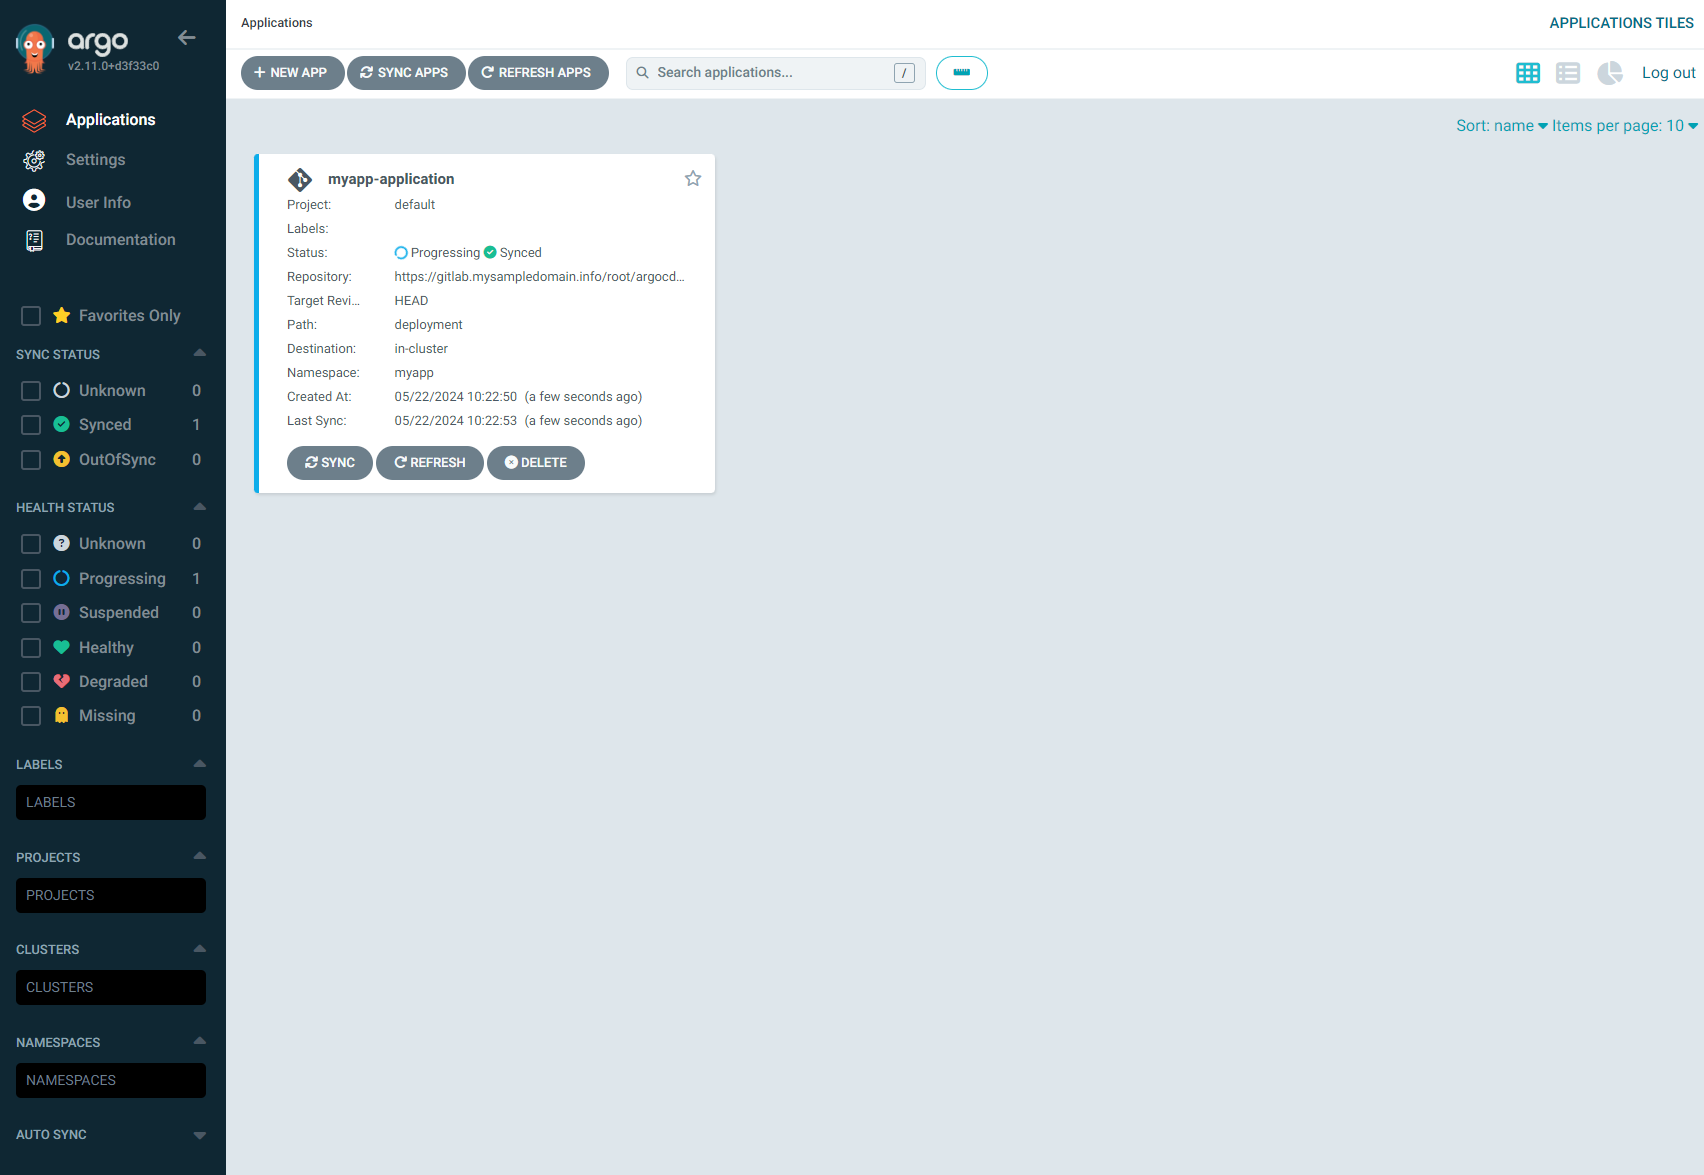
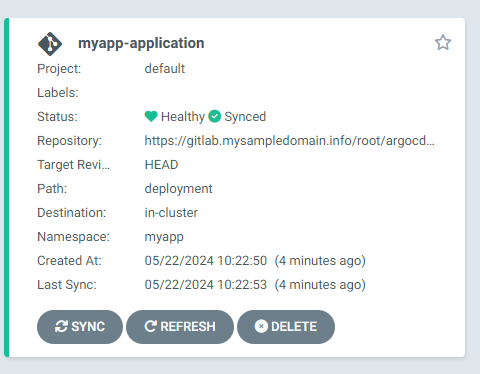
This is the view of our app after deployment was properly applied:
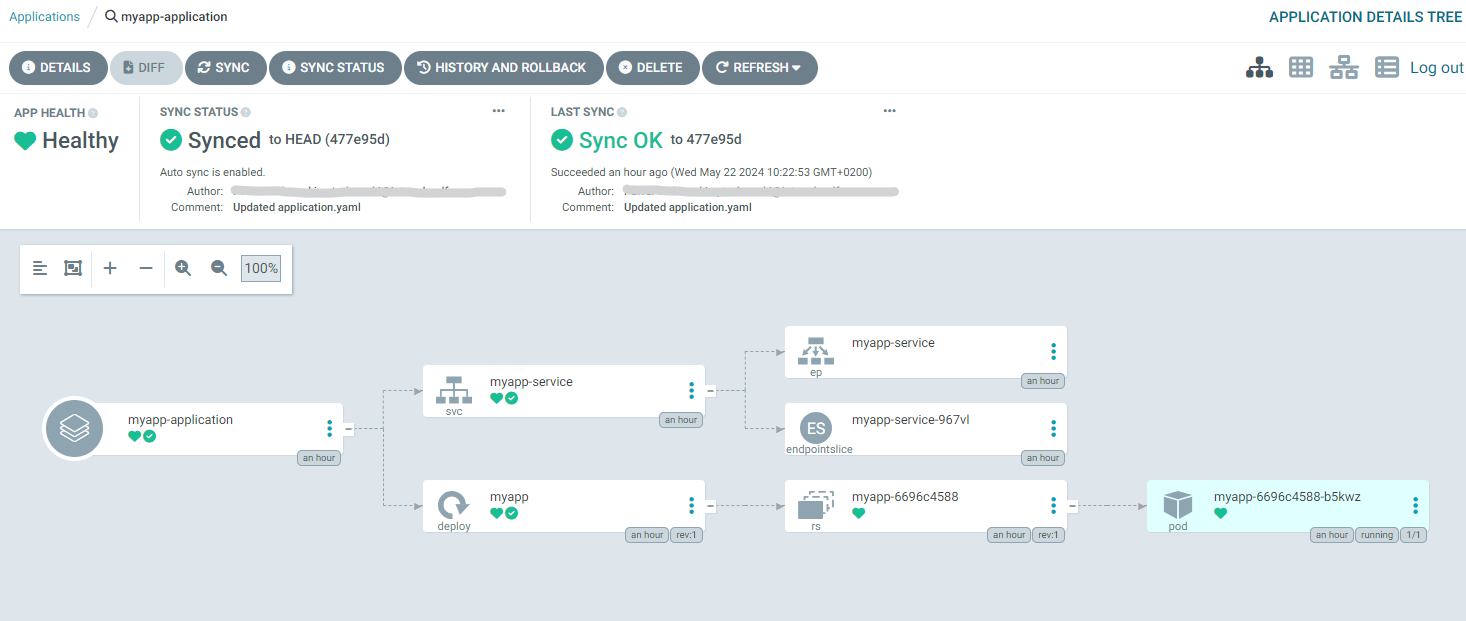
After clicking on the application’s box, we can also see the details of all the resources which contribute to this deployment, both high-level and low-level ones.
With the default settings, Argo CD will poll the Git repository every 3 minutes to capture the desired state of the cluster. If any changes in the repo are detected, the applications on the cluster will be automatically relaunched with the new configuration applied.
What To Do Next
test applying changes to the deployment in the repository (e.g. commit a deployment with different image in the container spec), verify ArgoCD capturing the change and changing the cluster state
customize the deployment of Argo CD to enable HTTPS
integrate Argo CD with your identity management tool; for details, see Deploy Keycloak on Kubernetes with a sample app on WEkEO Elasticity
Also of interest would be the following article: CI/CD pipelines with GitLab on WEkEO Elasticity Kubernetes - building a Docker image