OpenStack instance migration using command line on WEkEO Elasticity
This article covers how to migrate an instance from one WEkEO Elasticity cloud to another, for example from WAW3-1 cloud to WAW3-2.
The workflow involves downloading an image of that instance to your local computer or a virtual machine on WEkEO Elasticity cloud and then uploading it to a different cloud.
What We Are Going To Do
Environments in which the operation can be performed
Explain types of instance migration on OpenStack cloud
Download an instance from the origin
Create image for migration
Upload an instance to the destination
Prerequisites
No. 1 Account
You need a WEkEO Elasticity hosting account with access to the Horizon interface: https://horizon.cloudferro.com.
No. 2 Installed OpenStackClient for Linux
Article How to install OpenStackClient for Linux on WEkEO Elasticity will show you how to
install Python,
create and activate a virtual environment, and then
connect to the cloud by downloading and activating a proper RC file from the WEkEO Elasticity cloud.
No. 3 Have ready credentials for both clouds
In this article, there are two clouds to consider:
- The origin
The cloud you are downloading the instance from.
- The destination
The cloud you are uploading the image to.
These two clouds may have different authentication procedures. There are four combinations, depending on the number of factors that need to be supplied:
No. |
Origin |
Destination |
|---|---|---|
1 |
one-factor |
one-factor |
2 |
one-factor |
two-factor |
3 |
two-factor |
one-factor |
4 |
two-factor |
two-factor |
Article /accountmanagement/How-to-activate-OpenStack-CLI-access-to-WEkEO-Elasticity-cloud-using-one-or-two-factor-authentication explains both types of authentication so apply as needed. Download RC files from both clouds and they will naturally have different names. For instance, in combination No. 3, the name could be cloud_00734_1-openrc-2fa.sh as it has two-factor authentication, while the second file could be named cloud_00341_3-openrc.sh as it has one-factor authentication enabled on the account.
No. 4 General instructions for uploading image using CLI commands
The article How to upload your custom image using OpenStack CLI on WEkEO Elasticity describes the procedure to download an operating system image to the local computer and upload it to the chosen cloud. In this article, you are going to do the same except that the image you are migrating originates in your cloud and may contain your own specialized software.
That article is also more technical and also explains how to deal with errors that may happen in the process.
Note
Windows images can be migrated in this same fashion.
Environments in which the operation can be performed
There are different environments in which the operation can be performed. No matter which environment you choose, make sure that you have enough disc space for the image you will be downloading. Also, you should have the RC file for both clouds available to you - the origin cloud and the destination cloud.
Your local computer
You can use your local computer to download the instance. The exact amount of data that needs to be transmitted for that purpose will vary depending on the size of storage of your virtual machine. Usually, however, the amount of data will be significant.
A virtual machine
You can also use a Linux machine running on WEkEO Elasticity cloud. This might be especially useful under circumstances such as:
your Internet connection has data limits
you do not have enough storage
you don’t want to keep your computer running during the whole download process
you fear that you might be temporarily disconnected from the Internet
Volume
If that virtual machine does not have enough storage to perform a migration, you can attach a volume to it:
Transfer RC files
You can transfer the RC files to that virtual machine using scp. For example, if:
your RC file is in your current working directory and is called cloud_00734_1-openrc-2fa.sh
the floating IP of your virtual machine is 1.2.3.4
you are using a virtual machine created using a default image
the command could be:
scp cloud_00734_1-openrc-2fa.sh eouser@1.2.3.4:/home/eouser
tmux
If you want to keep the download and/or upload running even after you’ve disconnected from your virtual machine, you can use tmux. It should keep your terminal session if the VM does not get shut down.
Note that instructions below are for Ubuntu. If you are using a different distributions, these commands might require adjustments.
First, install tmux:
sudo apt install tmux
Start tmux:
tmux
Execute commands like you would normally do. If you want to leave your virtual machine, press the following sequence of keys:
Press CTRL+b and release the keys
Press d on your keyboard
You should be returned to the previous command prompt. You can now enter exit to disconnect from your virtual machine.
If you want to return to your to the session you left, connect to your virtual machine using SSH again.
After that, execute the following command:
tmux a
You should be returned to the previous session.
You can execute exit inside tmux to stop the session.
Downloading an instance
Activate the RC file for the origin, for example:
source ./cloud_00734_1-openrc-2fa.sh
List your instances:
openstack server list
The result will be similar to this output:
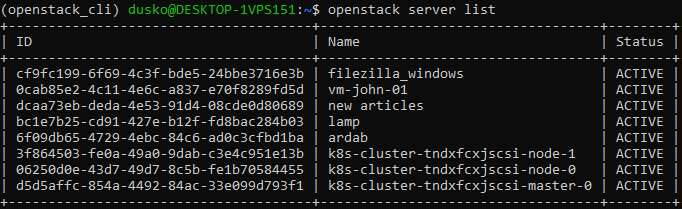
Let’s say that the instance you want to migrate has the id equal to 0cab85e2-4c11-4e6c-a837-e70f8289fd5d and that is what we use in this article. You be sure to read the appropriate ID value from server list and replace 0cab85e2-4c11-4e6c-a837-e70f8289fd5d with it in the rest of this article.
Shut off the instance:
openstack server stop 0cab85e2-4c11-4e6c-a837-e70f8289fd5d
There are two ways to check whether it is turned off. One is to execute the openstack server list command again and see the Status. If the server is stopped, the status should be SHUTOFF.

The other way is to show the server and print only its state:
openstack server show 0cab85e2-4c11-4e6c-a837-e70f8289fd5d | grep power_state
With this command, the status is Shutdown instead of SHUTOFF but the meaning is the same.

Create image for the migration
The instance is stopped and you are now going to create its image in the cloud. The instance now has the ID of 0cab85e2-4c11-4e6c-a837-e70f8289fd5d but once it is migrated, it will have another ID. In order to track it on the new server, you will use the --name parameter to create a name for the instance. That name here is, simply: Migration image.
The command to create a named image is
openstack server image create --name "Migration image" 0cab85e2-4c11-4e6c-a837-e70f8289fd5d
Another way is command shelve. It creates a
proper image and
changes instance status to Shelved Offloaded.
openstack server shelve 0cab85e2-4c11-4e6c-a837-e70f8289fd5d
Regardless of which option is used, you need to check whether the new image was created properly.
openstack image list --private
Here is the result in this particular case:

The image has the ID of 1fedb775-deef-4bfd-9ec2-ee67f65a461b so that is what you are going to use in the forthcoming commands.
The size cannot be 0 bytes and should have a similar size as the instance itself. Here is how to check the size:
openstack image show 1fedb775-deef-4bfd-9ec2-ee67f65a461b | grep min_disk
This is the result:

Download newly created image to local disk. Its name will be image.raw and you may wait from a couple if minutes up to a couple of hours for it to download, depending on the speed of your Internet connection.
openstack image save --file ./image.raw 1fedb775-deef-4bfd-9ec2-ee67f65a461b
The image is ready. In order to move it to a different cloud, you will have to activate proper credentials for that cloud.
Uploading an instance
Open another terminal session and activate access to the destination cloud; using the example data from Prerequisite No. 3, the activate command could look like:
source ./cloud_00341_3-openrc.sh
Now all the openstack commands will work on the destination cloud.
Upload the image
openstack image create --file ./image.raw "Migration image"
This may take a while. You can follow up what is happening if you enter the Horizon environment and list all images with the commands Compute –> Images. Here is the beginning of the uploading process:

Once in the destination cloud, you can use it just like any other image.
Warning: always use the latest value of image id
From time to time, the default images of operating systems in the WEkEO Elasticity cloud are upgraded to the new versions. As a consequence, their image id will change. Let’s say that the image id for Ubuntu 20.04 LTS was 574fe1db-8099-4db4-a543-9e89526d20ae at the time of writing of this article. While working through the article, you would normally take the current value of image id, and would use it to replace 574fe1db-8099-4db4-a543-9e89526d20ae throughout the text.
Now, suppose you wanted to automate processes under OpenStack, perhaps using Heat, Terraform, Ansible or any other tool for OpenStack automation; if you use the value of 574fe1db-8099-4db4-a543-9e89526d20ae for image id, it would remain hardcoded and once this value gets changed during the upgrade, the automated process may stop to execute.
Warning
Make sure that your automation code is using the current value of an OS image id, not the hardcoded one.
What To Do Next
You can upload a downloaded image through Horizon as well:
/cloud/How-to-upload-custom-image-to-WEkEO-Elasticity-cloud-using-OpenStack-Horizon-dashboard